In Honkai: Star Rail, the journey to the Eternal Holy City Okhema in Amphoreus begins after following Black Swan's suggestion in Penacony. This latest Trailblaze Mission introduces players to a new planet, but the exploration quickly turns chaotic as the train coach is attacked, scattering the team. Thankfully, Phainon intervenes, guiding the players to the awe-inspiring "Eternal Holy City" Okhema and introducing them to key figures in the region.
Eternal Holy City Okhema Treasure Locations in Honkai: Star Rail
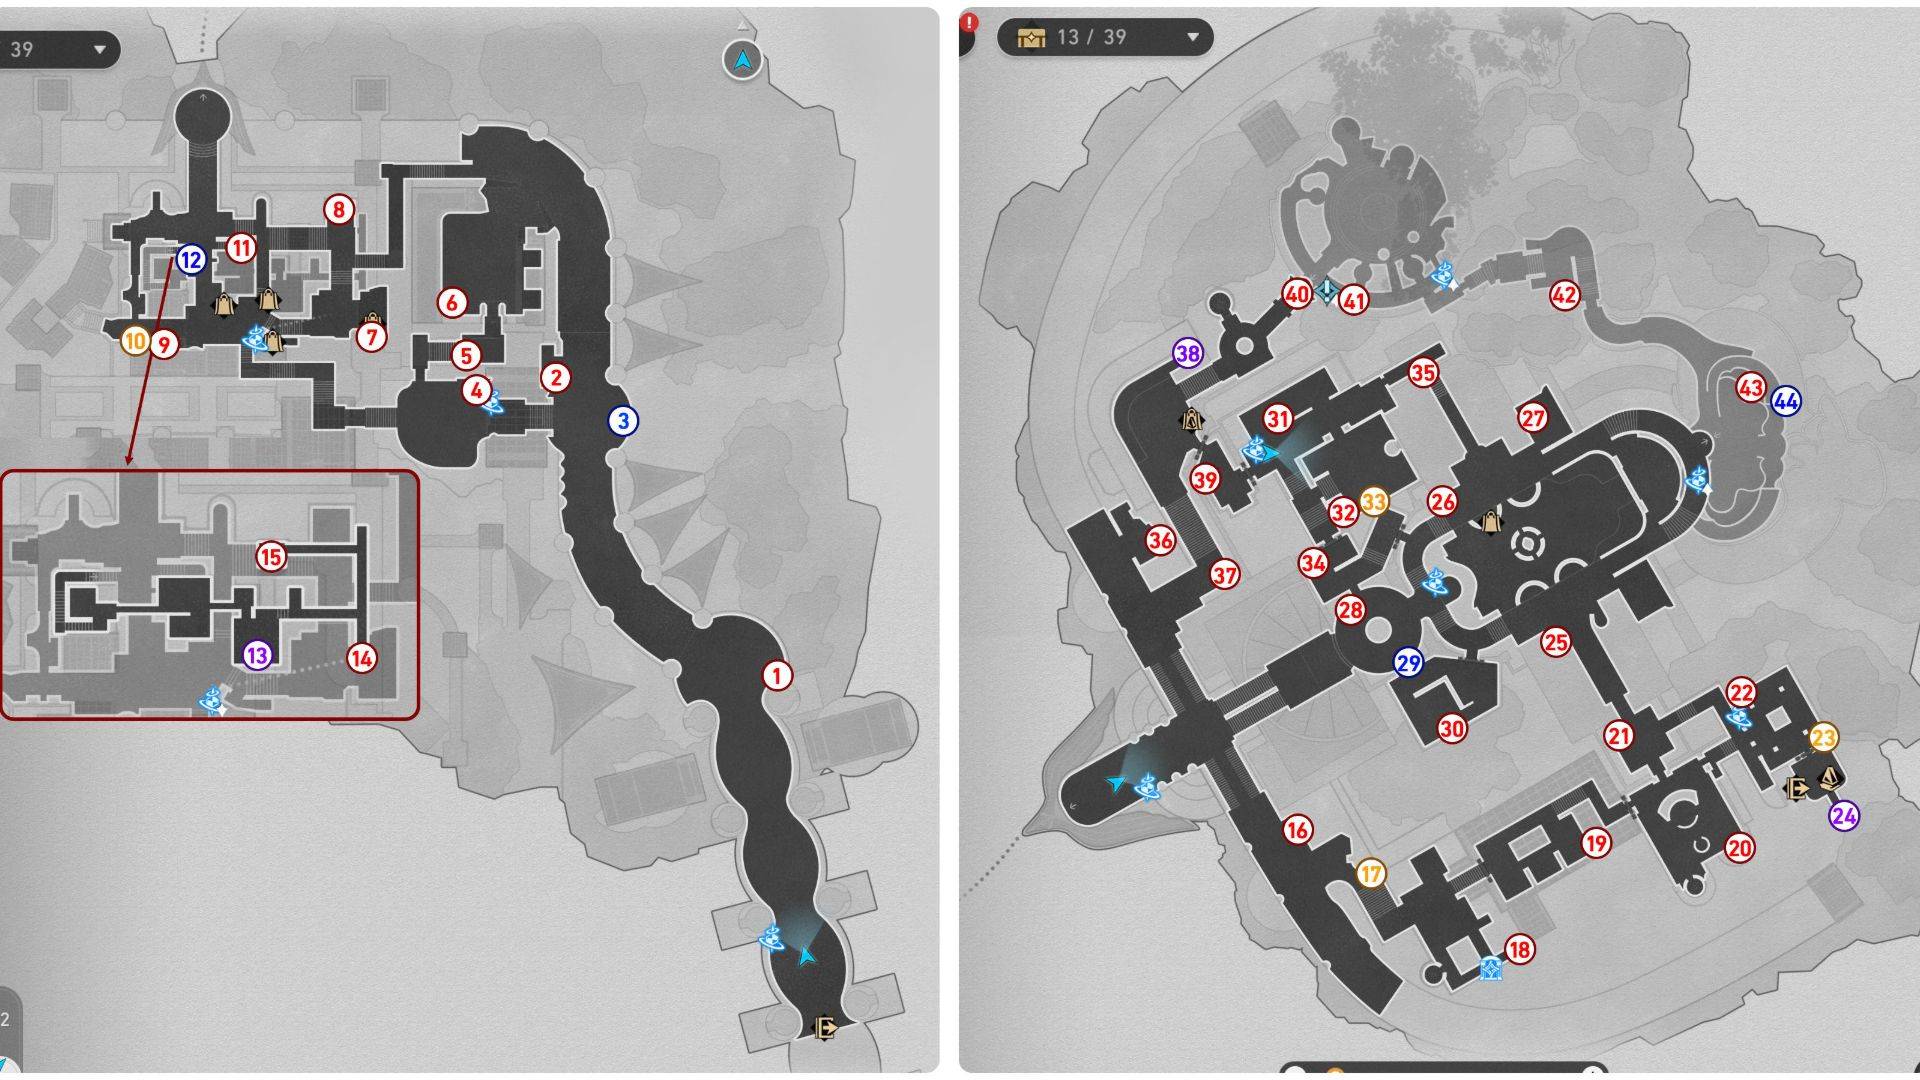
The Eternal Holy City Okhema in Honkai: Star Rail boasts an impressive array of collectibles, including 33 Treasure Chests, 4 Flying Spears, 3 Spirithiefs, and 4 Golden Scapegoats. To maximize your treasure hunting efficiency, consider bringing 'The Herta' along, as her Technique highlights several unclaimed treasure chests on the map. Additionally, Topaz can be invaluable; her companion Numby will alert you when you're near a chest, guiding you straight to it.
The map is color-coded for ease of navigation: blue marks the locations of Golden Short Spears, purple indicates Spirithiefs, and yellow signifies Golden Scapegoat spots.
- 1. Start at the Path of Parting Space Anchor, head north to the spacious area, and look east for your first treasure chest.
- 2. Continue along the path to Kephale Plaza. Once the Space Anchor is in sight, walk past it and look east; the treasure chest awaits near the rest area.
- 3. From your current position, look southeast toward a breakable shield with an embedded spear. Rewind time to follow the Golden Short Spear, which will eventually spawn a treasure chest.
- 4. Teleport to the Kephale Plaza Space Anchor to find a treasure chest right beside it.
- 5. Head north through the small hallway, where you'll spot a Basic Treasure near some crates.
- 6. Keep following the hallway to a plaza; look west to find a treasure chest next to a dinosaur.
- 7. Use the Marmoreal Market Space Anchor and go east to find a treasure chest inside Chartonus Smithy, the blacksmith shop.
- 8. Continue north to find another Basic Treasure at the end of the road.
- 9. Return to the Marmoreal Market Space Anchor and head west to encounter two breakable shields. Break them to reveal a treasure chest.
- 10. Adjacent to the previous chest, engage with the new Golden Scapegoat puzzle. Guide the goat to light up the altar and unlock the chest.
- 11. Back at the market's center, look north to find two small steps. Climb the right-side steps to claim a Basic Treasure.
- 12. Descend the stairs and go to the opposite side to see another breakable shield with a spear. After breaking the shield, fix and follow the Golden Short Spear to the second floor.
- 13. The spear should lead you to the ritual fountain. From there, head east to walk on the rooftops until you reach a treasure chest at the edge. Be prepared for a Spirithief to snatch it; use Oronyx’s power to rewind the fissures and retrieve the stolen treasure.
- 14. Find the next chest at the southern end of the road.
- 15. After securing the previous chest, head northwest for the last treasure chest on the rooftops.
- 16. Use the Marmoreal Palace Space Anchor and head southeast to the Dromas Stop. The treasure chest is behind a breakable shield.
- 17. Go to the eastern stairs to encounter a Golden Scapegoat puzzle. Solve it for a Basic Treasure chest.
- 18. Continue up the road to a small bathing area; the chest is in the corner near a lounge chair.
- 19. Head northeast to a room filled with scrolls; the treasure chest is near the last cabinet.
- 20. Move further northeast to another bathing area; the treasure chest is by the long table.
- 21. Look at the door leading north; a Basic Treasure awaits inside a room with a bard and listeners.
- 22. Warp to the Hall of Respite Space Anchor and turn around to find a treasure chest beside the anchor.
- 23. Cross the room to solve another Golden Scapegoat puzzle and unlock a treasure.
- 24. Enter the private chamber next to the previous puzzle and walk to the balcony's end to find a Spirithief's treasure chest.
- 25. Head to the Overflowing Bath Space Anchor, go to the southern part of the bathroom, and retrieve the treasure chest from the water.
- 26. Cross to the opposite side of the room to find another chest in the water.
- 27. From there, walk northeast to a swimming pool with a Dromas; the treasure chest is in the water beside the animal.
- 28. Return to the Overflowing Bath Space Anchor and pass through the waterfall to the reception area. A treasure chest is beside a chair.
- 29. Walk to the opposite side of the room, destroy the breakable shield, fix the Golden Short Spear, and follow it to a chest.
- 30. While following the spear, enter the back room to find a treasure chest on top of a box.
- 31. Use the Court of Seasons Space Anchor to spot a treasure chest near the wall.
- 32. Head to the massage room in the south to find a Basic Treasure near the beds.
- 33. In the same room, solve the Golden Scapegoat puzzle to unlock a hidden treasure.
- 34. Leave the massage room and head south to find a treasure chest in the storage room.
- 35. Return to the Court of Seasons Space Anchor and go northeast to the corridor for another treasure chest.
- 36. Now, teleport to the Marmoreal Palace Space Anchor and head north to the crate storage area. The treasure chest is near a dinosaur.
- 37. Continue upward to find the next treasure chest near a group of NPCs.
- 38. Follow the path to a banquet and look to the left side of the stairs. The treasure chest is beside a cushion on top of the partition.
- 39. From there, enter the southern room to find a treasure chest behind a breakable shield.
- 40. Leave the room and head to the northern elevator, but don't use it yet. Instead, go to the back of the elevator for another hidden treasure chest.
- 41. Take the elevator to the second floor and head east to find a Basic Treasure near the Flying Amphora in front of a cabinet.
- 42. Continue to the Garden of Life Space Anchor and head east to a small private room for another treasure chest.
- 43. Teleport to the Hero’s Bath Space Anchor and go to the northern pool to find a treasure chest submerged in water.
- 44. Lastly, use the swirling pillar to climb upward and find a breakable shield with a flying spear. Fix the Golden Short Spear and follow it to unlock the final treasure chest in Okhema.
Collecting these treasure chests is a prime method for amassing Stellar Jades in Honkai: Star Rail. With the introduction of this new area in version 3.0, diligent Trailblazers can gather a substantial amount of Jades by uncovering all the chests and solving the puzzles scattered throughout Amphoreus.


![NULL [Remastered]](https://imgs.39man.com/uploads/71/1719651062667fcaf6c483b.png)